


Make IDM Full version without cracking 100% working
7/20/2012
Follow below steps .:

1. Make sure you have installed the latest version of IDM
from the official creators website.
2. Now after you have downloaded and installed the latest version
just close the IDM and now go to start menu and make a search for Notepad.
3. Now right click on Notepad and than Run It As Administrator.
4. Now navigate to .:
C: > Windows > System 32 > Drivers > etc. > Hosts.
5. When you are in the etc. folder you might not see any files their
as you have click on show all files on the right hand side below.
6. Now open the Hosts file With Notepad and paste all the below lines ,
Like I have Pasted In Below Image.
127.0.0.1 tonec.com
127.0.0.1 www.tonec.com
127.0.0.1 registeridm.com
127.0.0.1 www.registeridm.com
127.0.0.1 secure.registeridm.com
127.0.0.1 internetdownloadmanager.com
127.0.0.1 www.internetdownloadmanager.com
127.0.0.1 secure.internetdownloadmanager.com
127.0.0.1 mirror.internetdownloadmanager.com
127.0.0.1 mirror2.internetdownloadmanager.com

7. So now as you can see in the above image how
I have pasted all the lines @ the end of the Hosts file,
you have to do same as above, now hit save.
8. Now when you have saved the HOSTS File
you can simply enter any serials from below in your IDM Registration page
GRAB SERIALS FOR IDM
Internet Download Manager Serial Numbers .:
RLDGN-OV9WU-5W589-6VZH1
HUDWE-UO689-6D27B-YM28M
UK3DV-E0MNW-MLQYX-GENA1
398ND-QNAGY-CMMZU-ZPI39
GZLJY-X50S3-0S20D-NFRF9
W3J5U-8U66N-D0B9M-54SLM
EC0Q6-QN7UH-5S3JB-YZMEK
UVQW0-X54FE-QW35Q-SNZF5
FJJTJ-J0FLF-QCVBK-A287M
9. Now enjoy your full version IDM without purchasing or
patching it totally genuine and totally legal.
How to remove Babylon Search bar from firefox
7/16/2012
 For some strange and annoying reason, Bing is set to be the default
search provider for Firefox 4. Normally this wouldn’t be so bad –if
there were an easy way to change it (to Google). Additionally,
Firefox 4 has two input boxes at the top, the address bar and the search
bar. Both boxes are capable of performing searches, so it is just
wasted space having both. Now with version 12 out, for some this is
still the case. We covered how to customize the toolbar and get rid of the search bar
in our previous article. This time, we’ll look at how the more
complicated process of changing your default search provider for the
main address bar/box works.
For some strange and annoying reason, Bing is set to be the default
search provider for Firefox 4. Normally this wouldn’t be so bad –if
there were an easy way to change it (to Google). Additionally,
Firefox 4 has two input boxes at the top, the address bar and the search
bar. Both boxes are capable of performing searches, so it is just
wasted space having both. Now with version 12 out, for some this is
still the case. We covered how to customize the toolbar and get rid of the search bar
in our previous article. This time, we’ll look at how the more
complicated process of changing your default search provider for the
main address bar/box works.You may also read :-
SLOW PC ? Make your PC FASTER 100% WORKING
You may have noticed that the dedicated search box allows you to choose between providers. It also allows you to “Manage Search Engines…” But, unfortunately these changes only affect the search box, not the ‘Omnibar’esq Firefox 4 address box. You can even go as far as to remove all of the search engines from the list except for the one you want to use, but Firefox will still use the default (Bing) for any search terms typed into the main address bar. Let’s change that!
Step 1
Type about:config into the Firefox address bar. This will take you to the config warning page that says “This might void your warranty.” Take this warning label with a grain of salt, since Firefox doesn’t have a warranty. However, this is the advanced system settings area of Firefox, so don’t go messing around with stuff unless you’re a groovy expert.With that said, Click the “I’ll be careful, I promise!” button.

Step 2
In the Filter box, Type in keyword.URLUnder Preference Name, keyworld.URL should pop up. Right-Click it and Select Modify.
Step 3
The default URL is likely Bing, just erase it. Now all you need to do is Paste in the following URL that matches the search engine you would like the bar to use.Google Search: http://www.google.com/search?ie=UTF-8&oe=utf-8&q= Bing Search: http://www.bing.com/results.aspx?q= Yahoo! Search: http://search.yahoo.com/search?p=
Once entered, Click the OK button.
Done!
Changes should take effect immediately, to test it out open a new window (Ctrl+N) and type a search query into the address bar. If it performs a search on the search engine that you specified then you can close your about:config window and call it groovy. Now you’re using a search engine that you prefer, and you won’t be bothered by the default one.In my example, I changed my Firefox 4 default search provider to Google. Bing has it’s uses, but I find that it just doesn’t compare to Google in terms of speedy, relevant, search results.
How to remove watermark from an image or picture
7/16/2012
you may also read this :-
COMPRESS 1 GB OF DATA INTO 10 MB USING KGB ARCHIVER
There are several resources out there that teaches you how to remove watermark from pictures, but most of them are old. Although these guides are still relevant, in light of some new tools that has recently become available in our hands, I decided a new guide was necessary. Hence this tutorial.
Removing water mark using Photoshop CS5
The new iteration of Photoshop, Creative Suite 5 or CS5 in short, includes some handy tools that really helps in such tasks as removing watermarks. It’s called Content Aware Fill.For our example we will use an image from iStockPhoto and try to remove the watermark right across the face of the image.
Disclaimer: The use of materials from iStockphoto is for illustrative purposes only. We do not encourage stealing of copyrighted images from iStockphoto or from any other sources.

Open the image in Photoshop CS5, and select the “Spot Healing Brush Tool” from the toolbar. You can also press J to select it.

Select the option Content Aware Fill on the toolbar at the top.

Press [ or ] to increase or decrease the size of the brush as required, and carefully paint it over the watermark.

Release it, and the line is gone.

If the result is unsatisfactory, undo it or go back in History and repeat. Use the smallest brush size as possible to get good results.
For larger areas we will use the lasso tool. Select the watermark to remove using the Lasso Tool (L). Notice that I selected only a part of the watermark. This is because the image behind the watermark is not uniform. To get the best results work with small areas of the watermark. In this example, I left out the horn of the skull since it has a different texture.

Now press D. Make sure “Content Aware” is selected under “Use” and press OK.

Remember, you can always undo and repeat the steps. Here is the final result with the complete watermark removed. Not perfect but passable.

Removing water mark using GIMP
GIMP too has a Content Aware Fill type feature which can be added to the software using plug-ins.Download the Resynthesizer plugin and copy the executable called resynthesizer.exe to gimp-2.0\lib\gimp\plug-ins\ directory.
Download this script (from Newslily) and copy it to
gimp-2.0\share\gimp\scripts\
Restart GIMP to reload the scripts.
Open the image on GIMP and using the lasso tool to select the watermark. Again notice that I’m doing this by selecting smaller chunks of area and not the entire logo.

Now click on Filters>Enhance>Heal Selection.

Specify the radius to take the selection from. The default is 50 and should work fine. If it doesn’t, play around with the radius until you get the desired result. Once the heal is applied, the watermark should be gone.

Carry on with the rest of the image carefully selecting the areas to remove. This is the final result. Not bad, right?

How to Create Windows 7 Live CD/DVD/USB
7/16/2012
First, you will need the installation disk of Windows 7. Pop it into the optical drive and copy the contents to the hard drive.
Now download WinBuilder, unzip the contents and run the WinBuilder executable.

Select the project you want to download – Win7PE, in this case. From the dropdown menu at the top choose ‘Complete’. Click the ‘Download’ button to commence downloading of the necessary files, which should be about 35 MB.
After the download is completed, click on the Source tab and point the ‘Source Directory’ to the folder where you copied the installation files of Windows 7.

At this point, your live CD is ready to build. But you might want to customize it or add third party applications to the live CD, like we did in Windows XP live CD.
Adding Applications
To add applications to the CD, head to App Scripts page and search for the applications you wish to add. If you find them, you are in luck – somebody has already created it. Download the script, which should be a couple of hundred Kilobytes in size, and ending in the extension .script. Copy the script file to this directory:
\Projects\win7pe\Addons
The script doesn’t contain the actual application – it will be downloaded when the script is run and the program added to the CD. Under the ‘Addons’ folder you should see the application scripts you added. Depending on how the script was authored by the creator, you might get to customize the added application.
Creating your own application script is possible but is a laborious process. I haven’t even tried to learn
.
Customizing Appearance and Behavior
For customizing the appearance and behavior of the live CD, click on ‘Main Configuration’. Here you can adjust the screen resolution, choose a boot skin, boot manager and language.

To customize Windows Explorer button size and other behavior, expand the folder ‘Shell’ and click on Explorer shell. To change the desktop wallpaper, go into the ‘App’ folder. To customizing the boot screen, expand the ‘Finalize’ and click on the ‘Create ISO’ option.
Creating Bootable USB
If you wish to create a live USB instead of the live CD, expand the ‘Finalize’ folder and check the box
“Copy to USB device”
.

Finally, click the Play button to begin building the CD. This will take time. The final live CD will be only about 250 MB in size, but you will need at least 512 MB RAM to run the live CD.
Troubleshooting
It is possible you might run into some problems – I did. The script might fail to run and throw up some error message or the CD may refuse to boot. If that happens, you can go to the forums and ask about your specific problem. But there is an easier way out.
Download this pre-build package of scripts and applications that a WinBuilder user has created. It’s about 64 MB in size and comes with Opera Portable, 7-zip, DirectX, Microsoft Paint, Notepad, Wordpad and other useful programs. In addition, it enables you to apply more tweaks and customization like pin shortcuts to the taskbar and more.

After you have unzipped the contents of the downloaded package, fire WinBuilder and proceed from there. No additional download is necessary, unless you want to add more application. You can also uncheck any application you do not require.
DOWNLOAD ANDROID APPS ON PC WITH GOOGLE PLAY
7/07/2012
DOWNLOAD ANDROID APPS ON PC WITH GOOGLE PLAY

Android Market (Now, Google Play) has plenty of Applications both Paid and Free which add Fun and Simplicity to your Android experience. However, downloading Applications on Phone can be a real trouble, specially if you have a slow data connection.
There is no way provided by Google to download applications on the Computer. But, a simple trick can do the Job. You’ll be able to download Apps. from Google Play directly to your computer and then transfer to your phone. Just follow the following steps to do the job:
You need Chrome browser to do the trick. If you don’t already have it, download and install it from here.
- Open Chrome browser and install the APK Downloader Extension (Latest stable version is 1.2.1 which supports the new Google Play)
- Right click on the Google Chrome icon on your desktop and Choose Properties.
- Choose Shortcuts tab and add ‘ --ignore-certificate-errors --allow-running-insecure-content‘ at the end of Target box (without quotes) and click OK/Apply. Note that you need to leave a space after chrome.exe
- Close Chrome and Restart using the shortcut at the desktop.
- Open the Extension’s options page and fill up all the details. You will need the Device ID app. to find your Android device ID.
- Now, go to Google Play and further to the Application page of the App. you want to Download.
- Click the APK icon in your Address Bar to start downloading the application to your PC.
USE ANDROID APPS ON PC OR LAPTOP
7/07/2012
USE ANDROID APPS ON PC
No problem you have an android phone or not , now you can
use any android application by your laptop or desktop.

Lets follow the instruction
1.Download BlueStacks App Player from HERE
2. Install that software then open.
3. Right click on your android application which you want to run via your pc & click > open with.
4. Then click browse and go to c/program files/BlueStacks & select HD-ApkHandler from the list. your application will be installed.

5.now open BlueStacks App Player and see your application list !!!
Make Your moving ANd Coping Quickly With TeraCopy
7/04/2012
 TeraCopy is a simple utility that you can use to improve the Windows
file transfer process. The process of moving/copying files in Windows
can be quite time-consuming, especially when dealing with big sized
files or large numbers of small files. This small program is developed
to speed up this process. In addition, the users have more information
about the files that they transfer.
TeraCopy is a simple utility that you can use to improve the Windows
file transfer process. The process of moving/copying files in Windows
can be quite time-consuming, especially when dealing with big sized
files or large numbers of small files. This small program is developed
to speed up this process. In addition, the users have more information
about the files that they transfer. Once the program is installed, you have the option to set TeraCopy as the default copy handler. This application stands as a great alternative to the classic Copy function provided by Windows. In order to open the interface of the program just run TeraCopy.exe. Also, TeraCopy supports shell menu integration so you can also run it from the "Properties" context menu of the files or folders selected for transfer. Using TeraCopy, you are able to easily transfer files by copying or moving them to specific locations.
After selecting all the data a second window will appear. This compact window is a more complex version of the Windows progress bar. You can expand this window and view detailed information about the source files by pressing the "More" button. The user is able to drag and drop files/folders into this window, choose the file transfer type and watch the whole process for each file.
TeraCopy offers you the possibility to easily pause or resume the transfer process at any time. You are able to verify the transfer after it is finished. The application can be configured to skip the files that cannot be moved, therefore saving your precious time.
File handling in Windows will be definitely improved with TeraCopy!
You can Download Teracopy from Here
Number Pattern Programs in C
7/03/2012
Learn Number pattern program in C and generates new logics and new concept which is better for your FUture. Learn and Enjoy the new Patterns of number in C.

you can also read this :-
How To Play Sounds In C Language
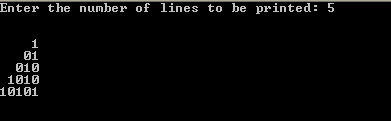
Number pattern :1

#include<conio.h>
#include<stdio.h>
void main()
{
int i,j,n;
clrscr();
printf("\nEneter the no of lines to be printed: ");
scanf("%d",&n);
for(i=0;i<n;i++)
{
for(j=0;j<=i;j++)
{
if(j%2==0)
printf("0");
else
printf("1");
}
printf("\n");
}
getch();
}
Number pattern :2

#include<conio.h>
#include<stdio.h>
void main()
{
int i,j,n,k;
clrscr();
printf("\nEnter the no of lines to be printed: ");
scanf("%d",&n);
for(i=0;i<n;i++)
{
for(j=n-i;j>0;j--)
{
printf(" "); //THIS IS THE CODE FOR PRINTING THE SPACES.
}
for(k=0;k<=i;k++)
{
if(k%2==0)
printf("0");
else
printf("1");
}
printf("\n");
}
getch();
}
Number pattern :3
#include<conio.h>
#include<stdio.h>
void main()
{
int i,j,n;
clrscr();
printf("Enter the number of lines to be printed: ");
scanf("%d",&n);
printf("\n\n");
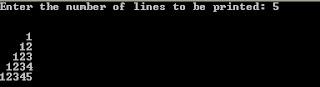
for(i=1;i<=n;i++)
{
for(j=1;j<=i;j++)
{
printf("%d",j);
}
printf("\n");
}
getch();
}
Number pattern :4
#include<conio.h>
#include<stdio.h>
void main()
{
int i,j,n,k;
clrscr();
printf("Enter the number of lines to be printed: ");
scanf("%d",&n);
printf("\n\n");
for(i=1;i<=n;i++)
{
for(j=1;j<=n-i;j++)
{
printf(" ");
}
for(k=1;k<=i;k++)
{
printf("%d",k);
}
printf("\n");
}
getch();
}
Number pattern: 5
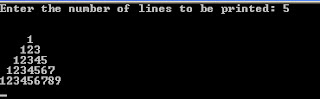
#include<conio.h>
#include<stdio.h>
void main()
{
int i,j,n,k;
clrscr();
printf("Enter the number of lines to be printed: ");
scanf("%d",&n);
printf("\n\n");
for(i=0;i<n;i++)
{
for(j=0;j<(n-i-1);j++)
{
printf(" ");
}
for(k=1;k<=2*i+1;k++)
{
printf("%d",k);
}
printf("\n");
}
getch();
}
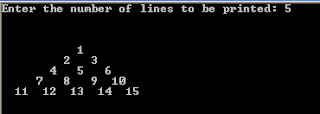
Number pattern:6
#include<conio.h>
#include<stdio.h>
void main()
{
int i,j,n,k;
clrscr();
printf("Enter the number of lines to be printed: ");
scanf("%d",&n);
printf("\n\n");
for(i=0;i<n;i++)
{
for(j=0;j<(n-i-1);j++)
{
printf(" ");
}
for(k=1;k<=i;k++)
{
printf("%d",k);
}
while(k>0)
{
printf("%d",k);
k--;
}
printf("\n");
}
getch();
}
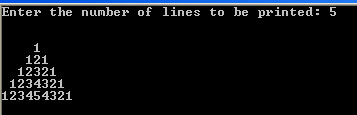
Number pattern:7
#include<conio.h>
#include<stdio.h>
void main()
{
int i,j,n,k,num=1;
clrscr();
printf("Enter the number of lines to be printed: ");
scanf("%d",&n);
printf("\n\n");
for(i=0;i<=n;i++)
{
for(j=0;j<(n-i);j++)
{
printf(" ");
}
for(k=1;k<=i;k++)
{
printf("%4d",num++);
}
printf("\n");
}
getch();
}
Number pattern: 8

#include<conio.h>
#include<stdio.h>
void main()
{
int i,j,n,k=1;
clrscr();
printf("Enter the number of lines to be printed: ");
scanf("%d",&n);
printf("\n\n"); for(i=0;i<n;i++)
{
for(j=0;j<=i;j++)
{
if(k%2==1)
printf("1");
else
printf("0");
k++;
}
printf("\n");
}
getch();
}
Number pattern 9
#include<conio.h>
#include<stdio.h>
void main()
{
int i,j,n,k=1,l;
clrscr();
printf("Enter the number of lines to be printed: "); scanf("%d",&n);
printf("\n\n");
for(i=0;i<n;i++)
{
for(l=n;l>i+1;l--)
printf(" ");
for(j=0;j<=i;j++)
{
if(k%2==1)
printf("1");
else
printf("0");
k++;
}
printf("\n");
}
getch();
}
Number pattern :10

#include<conio.h>
#include<stdio.h>
void main()
{
int i,j,n,k=1;
clrscr();
printf("Enter the number of lines to be printed: ");
scanf("%d",&n);
printf("\n\n");
for(i=n;i>0;i--)
{
for(j=0;j<n-i;j++)
{
printf(" ");
}
for(k=i;k>0;k--)
{
printf("%d",k);
}
printf("\n");
}
getch();
}
#include<stdio.h>
void main()
{
int i,j,n,k=1;
clrscr();
printf("Enter the number of lines to be printed: ");
scanf("%d",&n);
printf("\n\n");
for(i=n;i>0;i--)
{
for(j=0;j<n-i;j++)
{
printf(" ");
}
for(k=i;k>0;k--)
{
printf("%d",k);
}
printf("\n");
}
getch();
}
Number pattern :11

#include<conio.h>
#include<stdio.h>
void main()
{
int i,j,n;
clrscr();
printf("Enter the number of lines to be printed: ");
scanf("%d",&n);
printf("\n\n");
for(i=1;i<=n;i++)
{
for(j=i;j>0;j--)
{
printf("%d ",j);
}
printf("\n");
}
getch();
}
#include<stdio.h>
void main()
{
int i,j,n;
clrscr();
printf("Enter the number of lines to be printed: ");
scanf("%d",&n);
printf("\n\n");
for(i=1;i<=n;i++)
{
for(j=i;j>0;j--)
{
printf("%d ",j);
}
printf("\n");
}
getch();
}
Number pattern 12

#include<conio.h>
#include<stdio.h>
void main()
{
int i,j,k,n,l;
clrscr();
printf("\nEnter the no lines to be printed: ");
scanf("%d",&n);
printf("\n\n");
for(i=0;i<n;i++)
{
for(j=n-i;j>0;j--)
printf(" ");
for(k=i;k>0;k--)
{
printf("%d ",k);
}
for(l=2;l<=i;l++)
{
printf("%d ",l);
}
printf("\n");
}
}
#include<stdio.h>
void main()
{
int i,j,k,n,l;
clrscr();
printf("\nEnter the no lines to be printed: ");
scanf("%d",&n);
printf("\n\n");
for(i=0;i<n;i++)
{
for(j=n-i;j>0;j--)
printf(" ");
for(k=i;k>0;k--)
{
printf("%d ",k);
}
for(l=2;l<=i;l++)
{
printf("%d ",l);
}
printf("\n");
}
}
Number pattern :13
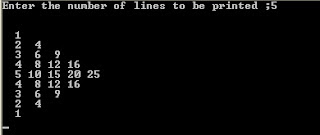
#include<conio.h>
#include<stdio.h>
void main()
{
int i,j,k,n;
clrscr();
printf("Enter the number of lines to be printed ;");
scanf("%d",&n);
printf("\n\n");
for(i=1;i<=n;i++)
{
for(j=1;j<=i;j++)
{
printf("%3d",(j*i));
}
printf("\n");
}
for(k=n-1;k>0;k--)
{
for(j=1;j<=k;j++)
printf("%3d",(k*j));
printf("\n");
}
getch();
}
Number pattern 14
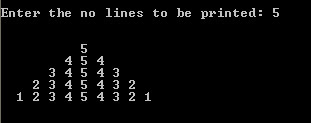
#include<conio.h>
#include<stdio.h>
void main()
{
int i,j,k,n,l;
clrscr();
printf("\nEnter the no lines to be printed: ");
scanf("%d",&n);
printf("\n\n");
for(i=0;i<n;i++)
{
for(j=n-i;j>0;j--)
printf(" ");
for(k=n-i;k<=n;k++)
{
printf("%d ",k);
}
for(l=n-1;l>=n-i;l--)
{
printf("%d ",l);
}
printf("\n");
}
}
IF any Problem then write in comment !
History About Google Logo Design
7/03/2012

Google was co-founded by Larry Page and Sergey Brin while they were students at Stanford University, and the company was first incorporated as a privately held company on September 7, 1998


Google
is a play on the word googol, a mathematical term for the number
represented by the numeral 1 followed by 100 zeros. The use of the term
reflects Google’s mission to organize a seemingly infinite amount of
information on the web.
Google Homepage on December 2 1998

Google Homepage on April 23 1999

Google Homepage on february 29 2000
Google Homepage on December 3 2000

Google Homepage on October 17 2001

Google Homepage on July 4 2002

Google Homepage on December 4 2002

Google Homepage on December 23 2003

Google Homepage on July 20 2004

Google Homepage on December 20 2005


.jpg)
.jpg)

.jpg)


