


How to Install Android On PC using Virtual Box
6/08/2014
.jpg) Normally Android is expected to on mobile devices of Now-A-Days Giants as Samsung, Google, HTC etc. But today we have a post of how to install the Android Operating system On the PC...
Normally Android is expected to on mobile devices of Now-A-Days Giants as Samsung, Google, HTC etc. But today we have a post of how to install the Android Operating system On the PC...
You should also read this :-
First of all, you have to download the ISO from the website of the androidx86 no need to think anymore just google it. And the Other important Software to be downloaded and install on your Mac or Windows or even Linux PC is Virtual Box. It is Open Source and available for all major OS platforms. And hell yeah!! you can download any of the famous android OS versions you need from Android Cupcake to the latest Android Kitkat from the androidx86 website.
In order to run Android 4.0+ you need to enable Intel VT-X or AMD-V in your bios configuration.
Now you need to open VirtualBox and create a new virtual machine. Click on New:

Fill the following fields:
- Name : Android 4.3 (or any name you like)
- Type : Linux
- Version : 2.6

Click Next to move to the next page of the wizard and set the Memory to 1GB,or at least, 512MB :

Click Next to all the other wizard’s pages leaving the default values. At the end of the wizard you’ll see something like this:

Now click on Settings and under Storage you need to select the iso file you downloaded before and click Ok.

You can now click on Start to boot the machine and after few seconds it will show the following screen. You need to selectInstallation and press Enter.

It’s now time to create a partition. Press Enter on Create/Modify partitions:

Now choose Primary, leave it the default size and press Enter.

We’ll make the partition bootable by pressing Enter when Bootable is selected. If the operation worked you’ll see under the Flags column the value Boot.

Using the Right Key move until Write and press Enter. It will ask to confirm and you’ll answer Yes. After it finish to write the partition you move to Quit using the Right Key and press Enter.
You have created the partition and now you can press Enter to use it to install Android.

You need to choose partition type ext3

It will ask you to confirm and you’ll reply Yes. It also will ask if you want to install GRUB and choose again Yes.

It will ask if you want to install /system directory as read/write and again Yes.
You finally installed Android 4.3 on your virtual machine. It’s time to run it!

The first time it will take some time to boot, but starting from the second time it’ll be faster.
Here we can finally see our Android 4.3 running. You’ll need to right click on the button below and select Disable Mouse Integration to see where you are tapping.

You can now follow the standard Android wizard and you’ll see Android 4.3 running on your PC.
Here some screenshots of Android 4.3 running:

Continue at your own risks. All indormation is given here on educational basis. Thank You
Get 1000+ Instagram Followers | 1000+ Likes On All Your Instagram Photos !!!
6/08/2014
.jpg)
This is a extreme and very detailed Guide which includes a lot of screen shots to help you throughout the process, so please do show some appreciation as to leave some feedback or other ways you may find suitable, thanks.
I released this Guide yesterday on a different Forum, but here it is for you guys as well:
Just follow the Steps listed below and you will be on your way to gaining the load :
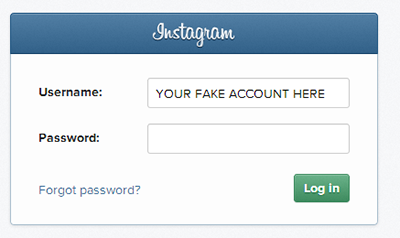
1. Get on your phone and make a new account for Instagram (this is required), this will act as a FAKE account in this proccess.
2. Once you have created the Account, go to your profile and add a Profile Picture, then edit your Bio (has to be over 5 characters), once you've done that take 5 random photos with it.
Now we are ready for the main part of this Guide.
3. Go to http://www.instahoot.com
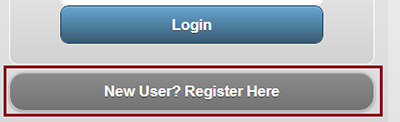
4. Click on the 'New User? Register Here' button.
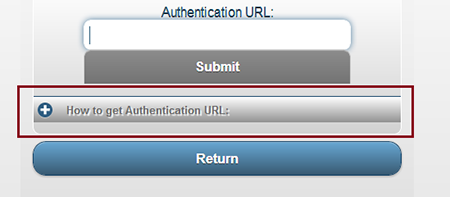
5. Once the new page loads, click 'How to get Authentication URL'.
6. Scroll down and click on the 'Click Here' link, that will log you out of any Instagrams account you may be logged in on the browser, now close that tab.

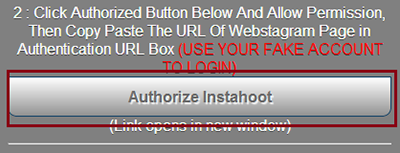
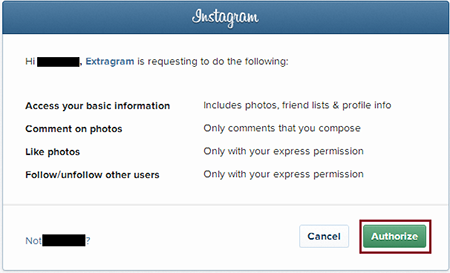
7. Once that is complete, click on the 'Authorize Instahoot' button.
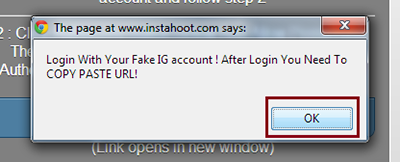
8. This will pop up, just click OK and it will open a new tab.
9. Now, sign in with the FAKE account you made earlier.
10. Click on the 'Authorize' button.
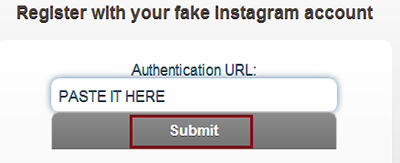
11. Copy the address on the address bar that shows up, now close the tab, then go paste it in the 'Authentication URL' box and press 'Submit'.

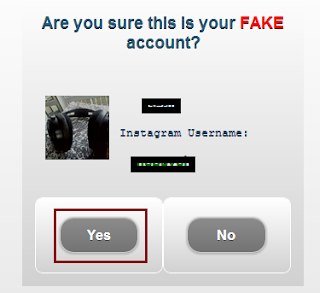
12. It will ask you if it's a FAKE account, press 'Yes'.
Now we have to register an Instahoot Account.
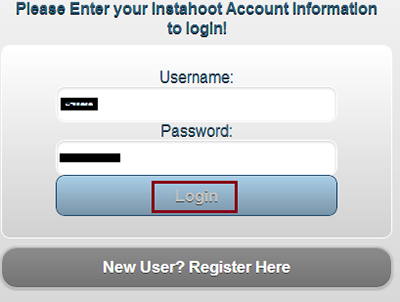
13. Choose a Username and Password, then type in your REAL Instagram account Username (the on you want likes on) in the third box and click 'Submit'.

It will take a little while (10-30 Seconds) to register.
14. Once that is completed, Click 'Return'.
Hooray, it's about time to get them likes and followers. ;)
15. Now login to your Instahoot account we just created, once logged in, click 'Return'.
To Get Likes : Scroll down and Press 'Instalike Photo!' on the photo you want likes on, it will take a few seconds to add all the likes, it will then go back to the same page where you can 'Instalike' all your photos and any new ones to come.
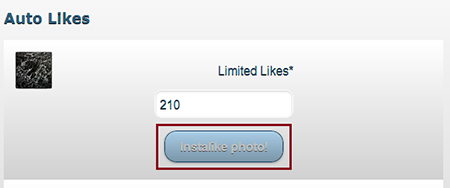
Note :- You will only receive 200 - 250 likes on each photo, but you can 'Instalike' on the same photos every 24 hours, if you keep doing this you'll reach 1000+ likes on all your photos in a few days time!
To Get Followers : Press the 'Follow Me' button and it will add around 80-150 followers in a few seconds and will return back to the page.
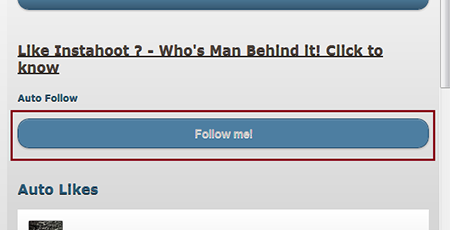
You can use the 'Follow Me' feature once every 24 hours, if you keep at it, you will reach 1000+ Followers in a no time.
Enjoy the likes and followers everyone!
Enjoy.......
Hot launches: Smartphones of 2014
6/05/2014

The year 2014 has come up
with an array of smartphones in wide segment ranging from entry, mid to high
end flagship models as per the needs and requirements of the consumers.
We cherrypick the top devices with impressive spec sheet that prove worthy of
your money.
Moto G
Earlier this month, the highly anticipated Moto G finally hit the Indian market exclusively via Flipkart. The smartphone comes with a 4.5-inch TFT LCD panel, which may be seem a bit small for the phablet crazy among us, but makes up for it with 720p resolution. It runs on Android 4.3 Jelly Bean, but the company has already started rolling out 4.4 KitKat.4

Moto G comes to India
The Moto G retails at Rs 12,499 for the 8GB and Rs 13,999 for the 16GB. This makes it the best, value-for-money offering under Rs 15,000 and quite possibly under Rs 20,000 as well. The Moto G does many things right but it’s not without its shortcomings. Expandable memory and 1GB of RAM are possibly the only major drawbacks of this phone. Read our complete Moto G review to know more.
Samsung Galaxy S5
After a string of leaks and rumours, Samsung unveiled its latest flagship, the Galaxy S5, at its Unpacked 5 event during the MWC 2014. Retaining most of the rumoured features, the Galaxy S5 comes with a fingerprint scanner and dust- and water-proof capabilities. The S5 is a 5.1-inch upgrade to the year older Galaxy S4 and sports a full HD screen with the same Super AMOLED panel, and not a 2k display as was hotly rumoured. The plastic-built Galaxy S5 also adds a heart-rate monitor just below the camera module. The smartphone comes with a 16MP camera with improved menu and user interface. It also gets a 2.1MP front-facing camera. Check out all the specs of the Galaxy S5.
Samsung Note 3 Neo
At its Forum 2014 in Bali, Samsung launched the Note 3 Neo for the Indian market at a price of Rs 40,900. It’s a lite version of the more premium Note 3. As an introductory offer, first 1,000 customers to pre-book the Note 3 Neo can take it home for Rs 38,990. The Neo has a striking resemblance with the Note 3, except for the difference in length and width. It sports a 5.5-inch Super AMOLED display with 720p resolution, compared to the 5.7-inch1080p screen fitted on the Note 3. It is powered by a hexa-core chipset with two 1.7GHz Cortex-A15 cores and four 1.3GHz Cortex A7 cores. Samsung packs in 16GB onboard storage and a microSD card slot. Samsung has given the premium 13MP camera and 4k recording a miss, as the Neo gets an 8MP camera and maximum 1080p video recording. Take a look at our quick hands on with the Note 3 Neo.
Samsung Grand Neo
At the Samsung Forum 2014, the company has also launched the mid-range Galaxy Grand Neo for Rs 18,450. The Neo comes fitted with a 5-inch TFT display, and a disappointing 480 x 800 pixels of resolution. Under the hood, the device will be powered by a 1.2GHz quad-core A7 processor with 1GB of RAM, similar to the one found in the Grand 2. The device gets a 5-megapixel rear camera with LED flash and a VGA front-facing camera. It has 8GB of internal memory, which is further expandable via a microSD card slot. It runs Android 4.2 Jelly Bean and not KitKat. The connectivity options include HSPA+ (21Mbps down, 5.76Mbps up), Wi-Fi 802.11 b/g/n, Wi-Fi Direct, Bluetooth 4.0, micro USB, GPS and GLONASS. Check out our hands-on with the Grand Neo right here.
At the Samsung Forum 2014, the company has also launched the mid-range Galaxy Grand Neo for Rs 18,450. The Neo comes fitted with a 5-inch TFT display, and a disappointing 480 x 800 pixels of resolution. Under the hood, the device will be powered by a 1.2GHz quad-core A7 processor with 1GB of RAM, similar to the one found in the Grand 2. The device gets a 5-megapixel rear camera with LED flash and a VGA front-facing camera. It has 8GB of internal memory, which is further expandable via a microSD card slot. It runs Android 4.2 Jelly Bean and not KitKat. The connectivity options include HSPA+ (21Mbps down, 5.76Mbps up), Wi-Fi 802.11 b/g/n, Wi-Fi Direct, Bluetooth 4.0, micro USB, GPS and GLONASS. Check out our hands-on with the Grand Neo right here.
Nokia X, X+ and XL
This month, we finally saw Nokia pull the wraps off its first ever Android-based phones at the MWC in Barcelona. Nokia has launched the X, X+ and XL smartphones which will run a forked version of Android. The smartphone won’t have access to the official Google Play Store, but it will be able to run most Android apps that are already available. The Nokia XL is said to be the flagship device coming next month. The budget Nokia X and X+ feature a 4-inch display with a 800×480 pixel resolution. Nokia did not announce the chipsets on stage, but the phones have a Snapdragon S4 SoC. The dual-core processor is clocked at 1GHz. There’s 512MB of RAM on the Nokia X, while the X+ gets 768MB of RAM. Both have 4GB internal storage and the ability to take in micro SD cards up to 32GB in capacity. Check out the Nokia X, x+ and XL in photos.

Nokia X has finally been announced (Image: Reuters)
Sony Xperia Z2
This month, we also saw the all-new Sony flagship dubbed Z2. The smartphone runs on Google’s latest Android 4.4 KitKat and is the first Xperia device to be able to shoot 4K video. The Z2 has borrowed waterproof and rugged capabilities from its predecessor, and sports a 5.2-inch 1080p full HD IPS display with a wide colour palette and Triluminos tech. It comes powered by a 2.3 GHz quad-core Snapdragon 801 and Adreno 330 GPU, coupled with 3GB of RAM. Sony has also added digital noise-cancelling capabilities and a massive 20.7-megapixel camera.
Blackphone
At MWC 2014, Silent Circle and Geeksphone launched their anti-NSA smartphone – Blackphone. The smartphone bundles a two-year subscription to the Silent Circle suite of apps and promises encrypted phone calls and e-mail for the user and up to three friends, irrespective of the handset owned. It also includes two years of Disconnect anonymous Wi-Fi and two years of SpiderOak anonymous cloud storage. After the two year subscription period, users can continue to use the services from Silent Circle apps by paying $10 per month. The privacy-focused device is now available for pre-order at $629.

Anti-snooping phone – Blackphone
Micromax Power
Focussing on prolonged battery life at affordable prices, Micromax has launched a new sub-Rs 10,000 smartphone in its Canvas series dubbed Power A96 at Rs 9,990. The biggest USP of the all-new Canvas Power is its 4,000 mAh battery. The battery promises up to up to 5.5 hours of talktime and up to 450 hours of standby time and we reckon it will easily last through the day, especially considering the other specs, which include a 5-inch TFT display with lowly 480×854 pixels of resolution, 1.3GHz quad-core MediaTek MT6582M processor with 512MB of RAM, dual-SIM capability, 4GB of onboard storage, microSD card and 5-megapixel rear camera with LED flash.
Focussing on prolonged battery life at affordable prices, Micromax has launched a new sub-Rs 10,000 smartphone in its Canvas series dubbed Power A96 at Rs 9,990. The biggest USP of the all-new Canvas Power is its 4,000 mAh battery. The battery promises up to up to 5.5 hours of talktime and up to 450 hours of standby time and we reckon it will easily last through the day, especially considering the other specs, which include a 5-inch TFT display with lowly 480×854 pixels of resolution, 1.3GHz quad-core MediaTek MT6582M processor with 512MB of RAM, dual-SIM capability, 4GB of onboard storage, microSD card and 5-megapixel rear camera with LED flash.
Gionee M2
Following in the footsteps of Micromax, Gionee launched the M2 with massive 4,200mAh battery. The Gionee M2 is a dual-SIM smartphone and runs Android 4.2 Jelly Bean, with Gionee’s Amigo UI customisations. The M2 sports a 5-inch display with 480×854 pixels of resolution. It is powered by a quad-core 1.3 GHz Cortex A7 processor coupled with 1GB of RAM. The chipset maker has not been unspecified in the official press release. On the connectivity front, it won’t disappoint users with support for 3G, Wi-Fi, Bluetooth and GPS/A-GPS. The 4GB onboard storage is expandable up to 32GB via microSD card slot.
Following in the footsteps of Micromax, Gionee launched the M2 with massive 4,200mAh battery. The Gionee M2 is a dual-SIM smartphone and runs Android 4.2 Jelly Bean, with Gionee’s Amigo UI customisations. The M2 sports a 5-inch display with 480×854 pixels of resolution. It is powered by a quad-core 1.3 GHz Cortex A7 processor coupled with 1GB of RAM. The chipset maker has not been unspecified in the official press release. On the connectivity front, it won’t disappoint users with support for 3G, Wi-Fi, Bluetooth and GPS/A-GPS. The 4GB onboard storage is expandable up to 32GB via microSD card slot.

M2 with a 5-inch display and massive 4,200mAh battery
You can also check out the new mid-range Sony Xperia M2, which was announced at MWC and the Micromax Elanza which went on sale earlier this month.
Nexus 6 Rumors and Expectations
6/02/2014
Google is undoubtedly the sire of the internet world. Its smartphone’s series called Nexus is too quite a popular and a hot property of the smart phone market.
Historically, the Google is supposed to launch only one Nexus smart phone every year that too at the end of the year. The last launched Nexus 5 was a successful phone which was like all the rendezvous of all the trending and current technology at affordable prices.
So, next in the series is Nexus 6 and many rumors are around the corner regarding the specs and features of this much awaited smartphone.
The most rumored thing about this phone is that it would be manufactured by Lenovo as Google recently sold the not so successful brand of its Motorola for 3 Billion US $ to it.
But, until or unless the phone is launched, we can’t say anything. Though, some rumors and expectations are here below based on the market sources.

Nexus 6 concept design by Jo Enaje
Design and Display
As the curved and flexible displays are getting very much attention after the trend started by Samsung Galaxy Curve and LG G Flex, it will be interesting to see that how Google approaches this technology.
People are expecting more on this curved side with UHD display, but, with more ease to handle and keep the phone in the pocket.
The size of display is also a point of concern as 5 inch screen is common, so Google could go for a bigger screen like 5.5 inch with a screen resolution of nearly 2640*1280p for Nexus 6.
Processor and Android
If rumors are to be believed, then Nexus 6 will be powered by a high class octa-core 2.5 GHz processor with at least 4 GB of RAM (expected) as the Nexus 5 already touched the mark of 3 GB RAM.
The Google is also planning to use the latest version of android for this Nexus phone. Android 4.4 ‘Kitkat’ is what you’re thinking? No, I said the word latest! Android 4.5 ‘Lollypop’ is what’s on the cards for the Nexus 6.
Camera and Features
You remember the tagline of Nexus 5 camera ‘capture the moments that matter’. Well, the high quality camera of Nexus 5 has just burdened up the expectations for Nexus 6 as it is supposed to have a 12 MP camera according to the rumors and with the features like 360 degree view, burst shot and auto save on Goggle+.
The front camera is also expected to be at least 2+ MP with 1080p@30fps video recording capacity.
If we talk about more features that people would like to see as the giants like Samsung has shown immense improvement with fingerprints and other biometric technology than, Nexus 6 should get the above feature along with glitch free air gesture and better face detection for security purpose.
Memory and Battery
The Nexus 5 was available in 16 GB and 32 GB version of internal memory. Now, as the processor and RAM could get better in the next launch than previous ones, the rumors are that the Nexus 6 might get available in a 64 GB version too.
The more colors are also expected like other manufactures except the traditional black and white.
The battery backup issues are always having been a nightmare for the smartphone users. With the tons of apps and features, the battery should provide a decent backup.
Nexus 6 might have a 3100+ mAh battery, according to the market birds to resolve this issue as the last phone has many complaints for its backup.
Price and Release Date
The smartphone with features like air gesture and fingerprint scanner, high end processor and RAM with the latest android and 64 GB of internal memory will surely be an expensive thing to owe.
The expected price for the 64 GB model with all the above features, if they come will be around 500 US $ or more. But, it’s worth it, I guess! What’d you say?
Google launches its smart phone at the beginning of November or later, after mixing up all the current trends and technology in its phone I think!
But, this time it could be before that in order to get the triumph before others. May be in October or so.
Wrap Up
If we look at all the rumors and mix our expectations with them then, the Nexus 6 is going to prove a milestone for the smartphone era. This will satisfy all the needs of a smart phone lover and people would like to light up their pockets to owe a device like the Nexus 6.
Wanna hack Your neighbor's Wifi WEP key ?? [100%]
5/29/2014
.jpg)
i.e if you have wifi you may save your wifi being hacked.
if You want to do the same this post is for you :-.
Security Issues With WEP
WEP (Wired Equivalent Privacy) was proved full of flaws back in 2001, WEP protocol itself has some weakness which allows the attackers to crack them in no time. The biggest flaw probably in a WEP key is that it supports only 40bit encryption which means that there are 16million possibilities only.
For more information on WEP flaws, kindly read the WEP flaws section here.
Requirements :-
1. Backtrack or any other Linux distro with aircrack-ng installed
2. A Wifi adapter capable of injecting packets , For this tutorial I will use Alfa AWUS036H which is a very popular card and it performs well with Backtrack
You can find compatible wifi card lists here.
Procedure :-
ifconfig wlan0 up

where wlan0 is the name of the wireless card ,it can be different .To see all wireless cards connected to your system simply type in " iwconfig ".
Putting your WiFi Adapter on Monitor Mode
To begin, you’ll need to first put your wireless adapter into monitor mode , Monitor mode is the mode whereby your card can listen to every packet in the air , You can put your card into monitor mode by typing in the following commands
airmon-ng start (your interface)
Example :- airmon-ng start wlan0

Now a new interface mon0 will be created , You can see the new interface is in monitor mode by entering "iwconfig mon0" as shown

Finding a suitable Target
After putting your card into monitor mode ,we need to find a network that is protected by WEP. You can discover the surrounding networks by entering the following command
airodump-ng mon0

Bssid shows the mac address of the AP, CH shows the channel in which AP is broadcasted and Essid shows the name broadcasted by the AP, Cipher shows the encryption type.
Now look out for a wep protected network In my case i’ll take “linksys “ as my target for rest of the tutorial
Attacking The Target
Now to crack the WEP key you'll have to capture the targets data into a file, To do this we use airodump tool again, but with some additional switches to target a specific AP and channel. Most importantly, you should restrict monitoring to a single channel to speed up data collection, otherwise the wireless card has to alternate between all channels .You can restrict the capture by giving in the following commandsairodump-ng mon0 --bssid -c (channel ) -w (file name to save )

As my target is broadcasted in channel 6 and has a bssid "98:fc:11:c9:14:22" ,I give in the following commands and save the captured data as "RHAWEP"
airodump-ng mon0 --bssid 98:fc:11:c9:14:22 -c 6 -w RHAWEP
Using Aireplay to Speed up the cracking
Now you’ll have to capture at least 20,000 data packets to crack WEP .This can be done in two ways, The first one would be a (passive attack ) wait for a client to connect to the AP and then start capturing the data packets but this method is very slow, it can take days or even weeks to capture that many data packetsThe second method would be an (active attack )this method is fast and only takes minutes to generate and inject that many packets .
In an active attack you'll have do a Fake authentication (connect) with the AP ,then you'll have to generate and inject packets. This can be done very easily by entering the following commands
aireplay-ng - 1 3 -a (bssid of the target ) (interface)

In my case i enter the following commands
aireplay-ng -1 3 -a 98:fc:11:c9:14:22 mon0
After doing a fake authentication ,now its time to generate and inject Arp packets . To this you'll have to open a new Konsole simultaneously and type in the following commands
aireplay-ng 3 -b (bssid of target) -h ( Mac address of mon0) (interface)

In my case i enter
aireplay-ng 3 -b 98:fc:11:c9:14:22 -h 00:c0:ca:50:f8:32 mon0
If this step was successful you'll see Lot of data packets in the airodump capture as shown

Wait till it reaches 20000 packets , best would be to wait till it reaches around 80,000 to 90,000 packets .Its simple more the packets less the time to crack .Once you’ve captured enough number of packets, close all the process's by clicking the into mark which is there on the terminal
Cracking WEP key using Aircrack
Now its time crack the WEP key from the captured data, Enter the following commands in a new konsole to crack the WEP key
aircrack-ng (name of the file )
In my case i enter
aircrack-ng RHAWEP-0.1-cap
With in a few minutes Aircrak will crack the WEP key as shown

Once the crack is successful you will be left with the KEY! Remove the colons from the output and you’ll have your WEP Key.
Hack Your Girl friend's WhatApp by 6 best spy Apps
5/27/2014
.jpg "hack whatsapp") |
How to Use WhatsApp Spy Programs?
- Download/Buy the software.
- Install it on your smartphone (as per the available downloads).
- Follow the installation rules from the control panel.
- Start tracking.
Top WhatsApp Spywares

1. iMobispy
(Available for Android, iOS, Blackberry, Windows Phone and Symbian devices.)
2. StealthGenie
(Available for Android, iOS and Blackberry devices.)
3. OwnSpy
(Available for Android and iOS devices.)
4. MobileSpy
(Available for Android, iOS, Blackberry, Windows Phone and Symbian devices.)
5. Mspy
(Available for Android, iOS, Blackberry, Windows Phone and Symbian devices.)
6. FlexiSpy
(Available for Android, iOS, Blackberry and Symbian devices.)
How to Track wi-fi Hackers?
5/27/2014
 Got a Wi-Fi net connection ? And do you think it is secure enough ? With the onset of cyber crimes taking place,your Wi-fi may be used illegally by hackers or some other people.Either you may get high internet bills in reward or you may be on headlines as your net may be compromised to send malicious emails to anyone,that's what happened in India sometime ago in Mumbai Bomb blast case. Well,there comes MoocherHunter™ to rescue.
MoocherHunter™ is a mobile tracking software tool for the real-time on-the-fly geo-location of wireless moochers and hackers. If you have ever wondered about the possibility of your wireless network getting used for illegal purposes, you must consider using Moocher Hunter. Using Moocher Hunter you can identify the location of the person i.e. an unauthorized user using your wireless network. Its then upto you to either give him a stern warning of not using your wireless network again or complaining to the legal authorities.
Recently Indian Police and RAW (Research and Analysis Wing) used Moocher Hunter to track the source of email which was sent from an unsecured Wi-Fi network from the home of an American expatriate,whose Network was compromised as someone wardived to use his net connection and send an email that took responsibility for a bomb blast that killed at least 42 people.
MoocherHunter is FREE to use and can easily predict the physical location of the computer using the WiFi connection.
The algorithms applied use various signal variables to accurately predict the position of the connected laptop/machine and allows to identify the location of an 802.11-based wireless moocher or hacker by the traffic they send across the network.MoocherHunter™ allows to pinpoint the location of a WIFI hacker upto an accuracy of 2 meters within an average of 30 minutes.
Moocherhunter is the ultimate Wifi hacker tracker tool and its a must for every Network security specialist,White hats,Black hats,Green and Grey hats out there.


.jpg)
.jpg)

.jpg)


.jpg)